# Job Management and Metrics
# Overview
The open source library Coravel uses invocable classes as a way for you to build isolated tasks/jobs that can be "understood" by Coravel - and they integrate seemlessly with .NET Core's dependency injection system.
However, Coravel Pro takes this idea even further - and calls them "jobs". A job is an invocable class, but with extra super powers.
Coravel Pro's job management allows you to:
- View a list of all your invocable classes.
- Ability to run them by simply clicking a button.
- View status of any running jobs.
- View history of all executed jobs.
- View any errors caused by failed jobs.
You can manage all your jobs by using an attractive and intuitive user interface. Piece of cake!
# Zero-Config
All you need is to create one or more invocable classes in your solution. Coravel Pro will automatically detect all of them and add them to .NET Core's service provider.
All your jobs will magically appear on the appropriate UI pages that Coravel Pro provides to you!
Excluding Invocables From Auto-Registration
By implementing the interface Coravel.Pro.IDoNotAutoRegister, a given invocable will not show up on the user interface and will not be automatically registered with the DI service container.
This may be useful for certain invocables that you do not want end-users to use, are still in testing, etc.
# Accessing Job Management
Navigate to /Coravel/Jobs in your internet browser to access Coravel Pro's job management.
# Job Health
At the top of the jobs page are a few metrics that help you determine the overall health of your jobs.

# Running Jobs
Next, you'll see a list of all your invocable jobs.
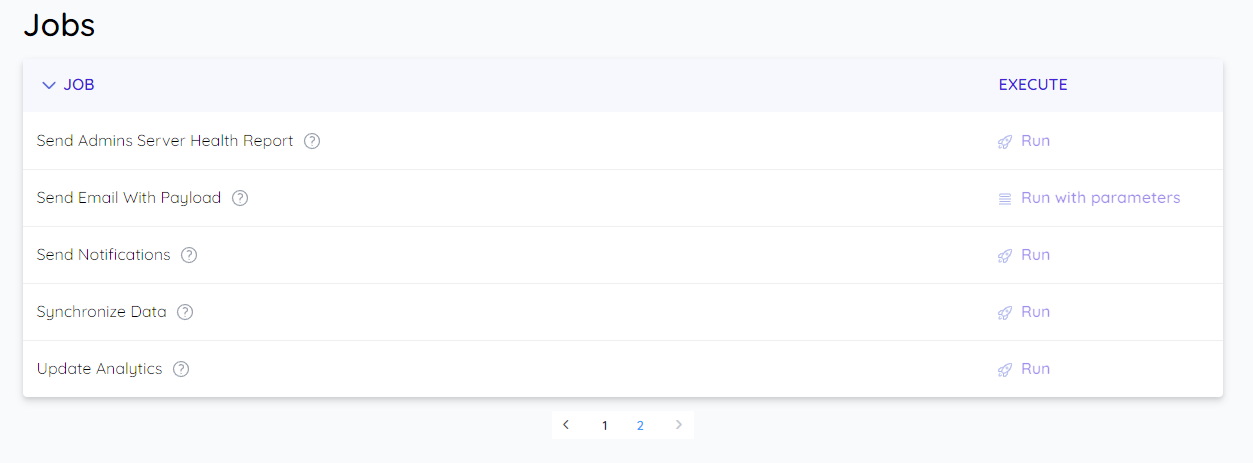
You may execute any job whenever you want by clicking Run.
FYI
Running a job will actually queue it by using Coravel's queue. Therefore, it might take a few seconds for your job to begin.
# Run Job With Parameters
For jobs that need custom data or configuration, Coravel Pro supports running jobs with parameters. This feature builds on Coravel's queuing with payload functionality and allows you to pass structured data to your jobs at execution time.
# Creating Jobs With Parameters
To create a job that accepts parameters, implement both IInvocable and IInvocableWithPayload<T> interfaces:
public class EmailPayload
{
    public string To { get; set; }
    public string Subject { get; set; }
    public string Body { get; set; }
    public bool IsUrgent { get; set; }
}

public class SendEmailJob : IInvocable, IInvocableWithPayload<EmailPayload>
{
    public EmailPayload Payload { get; set; }

    public async Task Invoke()
    {
        // Use the Payload properties to send an email
        await SendEmail(Payload.To, Payload.Subject, Payload.Body);
    }
}
# Running Job With Parameters
When Coravel Pro detects a job that implements IInvocableWithPayload<T>, it will automatically show a Run with parameters button instead of the regular Run button.
Clicking this button opens a dialog where you can edit the JSON parameters that will be passed to your job:
{
  "To": "user@example.com",
  "Subject": "Welcome!",
  "Body": "Welcome to our application!",
  "IsUrgent": false
}
# Parameter History
All parameters used when running jobs are automatically saved in the job history table. This allows you to:
- See exactly what parameters were used for each job execution
- Debug issues by reviewing the specific data that was passed
- Track how jobs were configured over time
Advanced Usage
You can use complex nested objects, arrays, and any JSON-serializable data structure as your payload. Coravel Pro will automatically generate an appropriate JSON schema for editing in the UI.
# Sorting
The list of available jobs is sortable (by clicking the "Job" header).
# Destructive Jobs
Sometimes you have jobs that are destructive: deleting database records, causing your server's performance to dip for a couple minutes, etc.
In these cases, you can make your job/invocable implement the interface Coravel.Pro.Features.Jobs.Interfaces.IDestructive.
Coravel Pro will add an extra confirmation for destructive jobs:

# Job History
Under the jobs list you will have a history of all jobs that you have executed from this management screen.

Note About Data Retention
Coravel Pro will delete all history (across all features) that are older than 30 days. This ensures your database doesn't get filled up by Coravel Pro 😉
# View Failed Job Details
The most important part of this screen is that you may see details of any failed jobs by clicking the "View Error" button.

# View Active Jobs
It will also display any jobs that are currently running.

Keeping Watch
This list is auto-refreshed every few seconds so you can keep a watch on any running jobs.